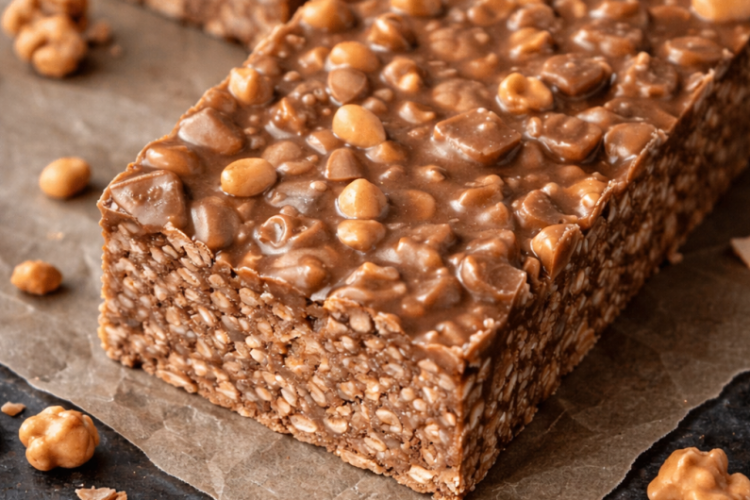
If you’re looking for a simple dessert that requires no oven, these No-Bake Chocolate Peanut Butter Crunch Bars are the perfect treat. They combine creamy peanut butter, rich chocolate, crispy cereal, and a buttery graham cracker base into a dessert that’s crunchy, chewy, smooth, and irresistibly delicious. Whether you’re making them for a family gathering, a party, a bake sale, or simply satisfying a sweet craving, these bars come together with minimal effort and maximum flavor.
One of the best things about this recipe is that it’s beginner-friendly. Even if you’ve never made homemade desserts before, you can easily prepare these bars by following the step-by-step instructions below. Since they don’t require baking, they’re especially great during hot weather when you want to avoid turning on the oven.
Why You’ll Love These Chocolate Peanut Butter Crunch Bars
These bars have everything a great dessert should offer:
- No baking required.
- Ready with simple pantry ingredients.
- Rich chocolate and creamy peanut butter flavor.
- Crispy, crunchy texture in every bite.
- Perfect for parties, holidays, and potlucks.
- Easy to make ahead.
- Stores well in both the refrigerator and freezer.
- Kid-friendly and adult-approved.
The combination of peanut butter and chocolate is a timeless favorite. Adding crispy cereal gives these bars a satisfying crunch while the smooth chocolate topping creates an elegant finish.
Preparation Time
- Prep Time: 20 minutes
- Chill Time: 2 hours
- Total Time: 2 hours 20 minutes
- Servings: 16 bars
Ingredients
For the Base
- 2 cups graham cracker crumbs
- 1 cup creamy peanut butter
- ½ cup unsalted butter, melted
- ¼ cup granulated sugar
- 1 teaspoon vanilla extract
- Pinch of salt
For the Crunch Layer
- 3 cups crispy rice cereal
- ½ cup roasted peanuts, roughly chopped (optional)
For the Chocolate Topping
- 2 cups semi-sweet chocolate chips
- ¼ cup creamy peanut butter
- 1 tablespoon butter
Kitchen Equipment
You’ll need:
- 9×9-inch baking pan
- Mixing bowls
- Rubber spatula
- Measuring cups
- Measuring spoons
- Microwave-safe bowl (or double boiler)
- Parchment paper
- Offset spatula or spoon
Step 1: Prepare the Pan
Line a 9×9-inch baking pan with parchment paper, leaving enough overhang on the sides. This makes removing the bars much easier after chilling.
Lightly grease the parchment paper with cooking spray or butter if desired.
Step 2: Make the Peanut Butter Base
In a large mixing bowl, combine:
- Graham cracker crumbs
- Melted butter
- Peanut butter
- Sugar
- Vanilla extract
- Salt
Mix everything thoroughly until the mixture resembles wet sand and holds together when pressed.
The peanut butter acts as both flavor and binder, while the butter helps create a rich texture.
Step 3: Add the Crunch
Pour the crispy rice cereal into the peanut butter mixture.
If using chopped peanuts, add them now.
Fold gently with a spatula until every piece of cereal is evenly coated.
Avoid crushing the cereal too much so the bars stay crunchy.
Step 4: Press into the Pan
Transfer the mixture into the prepared pan.
Using the back of a spoon or an offset spatula, firmly press the mixture into an even layer.
Take your time during this step because an even layer helps produce neat slices later.
Step 5: Make the Chocolate Topping
Place the chocolate chips, peanut butter, and butter into a microwave-safe bowl.
Microwave in 20-second intervals, stirring after each interval until smooth.
Alternatively, melt everything over a double boiler.
The mixture should become silky, glossy, and completely smooth.
Step 6: Spread the Chocolate
Pour the melted chocolate over the peanut butter layer.
Use a spatula to spread it evenly all the way to the edges.
Tap the pan gently on the countertop to remove air bubbles and smooth the top.
Step 7: Chill
Place the pan in the refrigerator.
Chill for at least 2 hours.
If you’re in a hurry, place the pan in the freezer for about 45 minutes.
The chocolate should become completely firm before slicing.
Step 8: Slice and Serve
Lift the bars out using the parchment paper.
Use a sharp knife to cut into 16 squares.
For perfectly clean slices, wipe the knife clean between each cut.
Serve chilled or allow the bars to sit at room temperature for about 10 minutes before eating for a slightly softer texture.
Tips for Success
Use creamy peanut butter for the smoothest consistency. Natural peanut butter can sometimes separate, making the bars softer.
Press the base firmly into the pan. If it’s loosely packed, the bars may crumble when cut.
Don’t overheat the chocolate, as it can become thick or grainy. Melt it slowly and stir frequently.
Allow enough chilling time so the chocolate hardens completely.
Using parchment paper makes removal and slicing much easier.
Flavor Variations
These bars are highly customizable.
Pretzel Crunch
Replace one cup of cereal with crushed pretzels for a sweet-and-salty twist.
Cookie Version
Mix crushed chocolate sandwich cookies into the base.
Nut Lover’s Bars
Add chopped almonds, pecans, walnuts, or cashews.
Dark Chocolate
Substitute dark chocolate chips for a richer flavor.
White Chocolate Drizzle
Drizzle melted white chocolate over the top before chilling.
Caramel Version
Spread a thin layer of caramel sauce between the peanut butter base and chocolate topping.
Marshmallow Crunch
Mix miniature marshmallows into the cereal layer after the peanut butter mixture has cooled slightly.
Storage Instructions
Store the bars in an airtight container.
Refrigerator
Keep refrigerated for up to 1 week.
Separate layers with parchment paper to prevent sticking.
Freezer
Freeze for up to 3 months.
Wrap each bar individually in plastic wrap before placing them in a freezer-safe container.
Thaw in the refrigerator overnight before serving.
Make-Ahead Instructions
These bars are ideal for preparing ahead of time.
Make them one or two days before serving.
The flavors actually improve after resting overnight in the refrigerator.
Serving Suggestions
These bars pair wonderfully with:
- Cold milk
- Coffee
- Hot chocolate
- Vanilla ice cream
- Fresh strawberries
- Fresh raspberries
- Whipped cream
They’re perfect for birthday parties, picnics, bake sales, family gatherings, lunchbox treats, and holiday dessert trays.
Common Mistakes to Avoid
- Not pressing the base firmly enough.
- Overheating the chocolate.
- Cutting before the bars are fully chilled.
- Using too much cereal, which can make the bars dry.
- Forgetting to line the pan with parchment paper.
Nutritional Information (Approximate Per Bar)
- Calories: 320
- Carbohydrates: 29 g
- Protein: 6 g
- Fat: 21 g
- Saturated Fat: 9 g
- Cholesterol: 18 mg
- Sodium: 170 mg
- Fiber: 2 g
- Sugar: 20 g
Nutritional values are estimates and may vary depending on the brands and ingredients used.
Frequently Asked Questions
Can I use crunchy peanut butter?
Yes. Crunchy peanut butter adds extra texture and small peanut pieces throughout the bars.
Can I make these gluten-free?
Absolutely. Use certified gluten-free graham crackers and gluten-free crispy rice cereal.
Can I use milk chocolate?
Yes. Milk chocolate creates a sweeter, creamier topping. Dark chocolate provides a richer, less sweet finish.
Can I substitute almond butter?
Yes. Almond butter, cashew butter, or sunflower seed butter all work well, though they will slightly change the flavor and texture.
Why are my bars falling apart?
This usually happens if the mixture wasn’t pressed firmly enough or if the ingredient ratios were altered. Be sure to measure accurately and chill thoroughly before slicing.
Do these bars need refrigeration?
Yes. Refrigeration helps the chocolate topping stay firm and keeps the bars fresh. They can sit at room temperature for about an hour when serving but should be returned to the refrigerator afterward.
Can I double the recipe?
Yes. Double all ingredients and prepare the bars in a 9×13-inch pan. The chilling time remains about the same, though thicker bars may need a little longer to fully set.
Final Thoughts
No-Bake Chocolate Peanut Butter Crunch Bars are a dependable dessert that’s easy to prepare and consistently satisfying. Their combination of creamy peanut butter, crisp cereal, buttery graham cracker crumbs, and smooth chocolate creates a balanced mix of textures and flavors that appeals to both children and adults. Because they require no baking, they’re a convenient option for busy schedules, warm weather, or anyone looking for a straightforward homemade treat.
They’re also easy to adapt with ingredients like pretzels, chopped nuts, caramel, or white chocolate, making them suitable for a variety of occasions. Whether served at a celebration, packed for a picnic, or enjoyed as an everyday snack, these bars hold up well in the refrigerator or freezer and can be made in advance with excellent results. Once chilled and sliced, they’re ready to serve and are likely to become a favorite recipe you’ll return to again and again.
