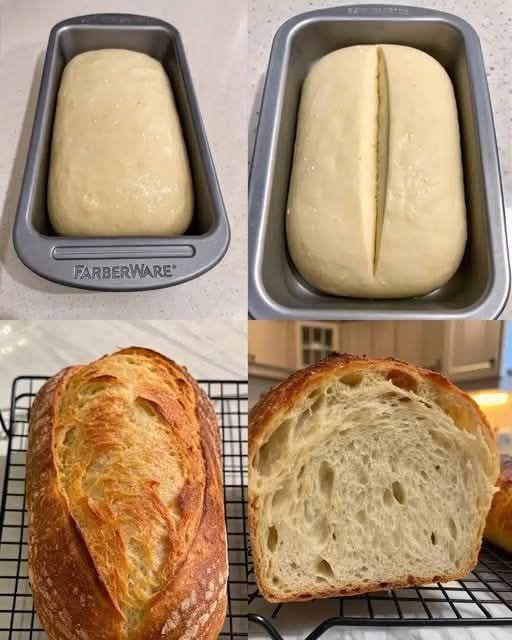
Making sandwich bread at home with a Thermomix is a simple way to create a soft, tender loaf with a light crumb and a fresh bakery-style taste. This recipe is designed for everyday sandwiches, toast, breakfast, lunch boxes, and snacks. The Thermomix makes the process easier by mixing, kneading, and helping develop the dough structure without requiring much manual effort.
This sandwich bread has a slightly sweet flavor, a soft texture, and a golden crust. It uses basic pantry ingredients such as flour, yeast, milk, butter, and a little sugar. The result is a loaf that is much fresher and more flavorful than many store-bought breads, while still being easy to slice and use for sandwiches.
Preparation Time
- Preparation: 15–20 minutes
- Kneading time in Thermomix: 5–7 minutes
- First rise: 1–2 hours
- Second rise: 30–60 minutes
- Baking time: 30–40 minutes
- Total time: About 3 hours including rising
Yield
- 1 large sandwich loaf
- Approximately 12–16 slices depending on thickness
Ingredients
For the Bread Dough
- 300 g whole milk or semi-skimmed milk
- 40 g unsalted butter, cut into small pieces
- 25 g sugar or honey
- 10 g active dry yeast (or 20 g fresh yeast)
- 500 g strong bread flour
- 10 g salt
- 1 large egg (optional, for a richer and softer loaf)
For Finishing
- 1 tablespoon melted butter for brushing the baked loaf
- Optional: sesame seeds, poppy seeds, oats, or sunflower seeds for topping
Instructions
Step 1: Prepare the Yeast Mixture
Start by adding the milk, butter, and sugar to the Thermomix mixing bowl.
Set the Thermomix to:
3 minutes / 37°C / speed 2
This gently warms the ingredients and allows the butter to soften. The temperature should be warm but not hot. Yeast works best in a mild warm environment, while very high temperatures can reduce yeast activity.
Add the yeast and mix:
10 seconds / speed 3
Allow the mixture to sit for about 5 minutes. During this time, the yeast begins activating. You may notice a light foam forming on the surface, especially if using fresh yeast.
Step 2: Add Flour and Remaining Ingredients
Add the strong bread flour, salt, and egg if you are using one.
It is best to keep the salt from sitting directly on the yeast mixture for a long period, as salt can slow yeast activity. Adding it with the flour helps distribute it evenly.
Mix briefly:
10 seconds / speed 4
This combines the ingredients and creates a rough dough.
Step 3: Knead the Dough
Use the Thermomix dough function:
5–7 minutes / Dough mode
The dough should become smooth, elastic, and slightly sticky. A good bread dough should feel soft and flexible rather than dry and stiff.
If the dough appears very wet and sticks heavily to the bowl, add a small amount of flour, about 10–20 g, and knead for another minute.
If the dough seems dry or crumbly, add 1 tablespoon of milk and knead again.
The exact amount of flour needed can vary depending on the brand of flour, humidity, and measuring method.
Step 4: First Dough Rise
Remove the dough from the Thermomix bowl. Shape it into a smooth ball and place it into a lightly greased large bowl.
Cover the bowl with plastic wrap, a damp kitchen towel, or a reusable cover.
Leave it in a warm place until doubled in size.
This usually takes:
60–90 minutes
The rising time depends on room temperature. In a warm kitchen, the dough may rise faster. In a cooler kitchen, it may take longer.
The dough is ready when:
- It has visibly doubled in size
- It feels airy when gently pressed
- A small indentation remains after pressing with a finger
Do not rush this stage. Proper rising creates a lighter, softer sandwich bread.
Step 5: Shape the Loaf
Once the dough has risen, gently remove it from the bowl.
Place it on a lightly floured surface.
Press the dough gently to remove large air bubbles. Avoid aggressively punching it down because you want to keep some air structure.
Shape the dough into a rectangle approximately the length of your loaf tin.
A useful shaping method:
- Flatten the dough into a rectangle.
- Fold the top third toward the center.
- Fold the bottom third upward.
- Roll the dough tightly from one end to the other.
- Pinch the seam closed.
Place the shaped dough into a greased loaf tin.
A standard loaf tin size is approximately:
- 23 cm x 13 cm (9 x 5 inches)
Place the seam underneath so the loaf keeps a neat shape.
Step 6: Second Rise
Cover the loaf tin loosely and leave the dough to rise again.
Allow:
30–60 minutes
The dough should rise above the edge of the tin or reach close to the top.
The second rise is important because it gives the bread a soft texture and prevents a dense loaf.
Avoid letting it rise too much. Over-proofed dough may collapse during baking and create a weaker structure.
Step 7: Bake the Sandwich Bread
Preheat your oven to:
180°C (350°F)
Bake the bread for:
30–40 minutes
The loaf should become golden brown on top.
To check if it is fully baked:
- Tap the bottom of the loaf; it should sound hollow.
- The internal temperature should be around 90–95°C if using a thermometer.
- The loaf should feel firm but not heavy.
If the top browns too quickly, cover it loosely with aluminum foil during the last part of baking.
Step 8: Finish and Cool
Remove the bread from the oven.
Immediately brush the top with melted butter. This creates a softer crust and gives the loaf a beautiful shine.
Remove the bread from the tin after about 5–10 minutes and place it on a cooling rack.
Allow it to cool completely before slicing.
Cutting bread while it is still hot can make the inside appear gummy because the crumb is still setting.
For the best slices, wait at least 1 hour before cutting.
Storage Instructions
Homemade sandwich bread stays fresh for several days when stored correctly.
Room Temperature
Store in an airtight container, bread bag, or wrapped in a clean kitchen towel.
It is best consumed within:
3–4 days
Refrigerator
You can refrigerate the bread to extend its life, but refrigeration may make bread slightly firmer.
Warm slices briefly before eating for a softer texture.
Freezer
This bread freezes very well.
To freeze:
- Allow the loaf to cool completely.
- Slice the bread.
- Place slices in a freezer-safe bag.
- Remove individual slices whenever needed.
Frozen slices can go directly into a toaster.
Helpful Thermomix Bread Tips
Use Strong Bread Flour
Bread flour contains more protein than regular flour, which helps create gluten. Gluten gives bread its structure and allows it to rise properly.
Measure Ingredients Accurately
Bread depends on balance. Too much flour creates a heavy loaf, while too little flour creates a dough that is difficult to handle.
Using a kitchen scale is recommended.
Do Not Add Too Much Flour
Many people add extra flour because the dough feels sticky. However, slightly sticky dough often produces softer bread.
A soft dough usually creates a softer loaf.
Give the Dough Enough Time
The rising stages develop flavor and texture. Faster rising does not always create better bread.
Keep Yeast Fresh
Old yeast may not activate properly, resulting in a dense loaf.
Variations
Honey Sandwich Bread
Replace the sugar with 30 g honey for a naturally sweet flavor.
Whole Wheat Sandwich Bread
Replace half of the bread flour with whole wheat flour. You may need an extra tablespoon or two of milk because whole wheat flour absorbs more liquid.
Milk Bread Style
Use all milk instead of water and add an extra tablespoon of butter for a richer, softer loaf.
Seeded Sandwich Bread
Add seeds such as:
- Sesame seeds
- Flax seeds
- Sunflower seeds
- Pumpkin seeds
Sprinkle them on top before baking.
Serving Ideas
This Thermomix sandwich bread works beautifully for:
- Classic cheese sandwiches
- Chicken sandwiches
- Egg salad sandwiches
- Peanut butter and jam sandwiches
- French toast
- Breakfast toast with butter and honey
- Grilled sandwiches
- School lunch boxes
Its soft texture makes it suitable for children, while its homemade flavor makes it enjoyable for adults.
Final Result
This Thermomix sandwich bread recipe produces a soft, fluffy, slightly sweet loaf with a tender crumb and a golden crust. The Thermomix simplifies the process by handling the mixing and kneading, while proper rising and baking create the texture of traditional homemade bread.
Once you make this loaf at home, you can easily adjust the sweetness, flour type, toppings, and size to create your ideal everyday sandwich bread. It is a reliable recipe that can become a regular part of your baking routine.
