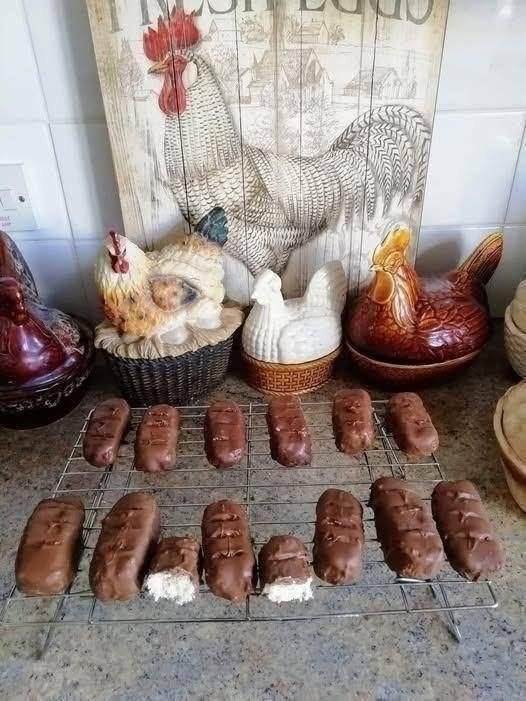

If you love the combination of rich chocolate and sweet, chewy coconut, these Chocolate-Covered Coconut Bars are a must-try! They are simple to prepare, look beautiful on a dessert tray, and make a wonderful homemade treat for holidays, parties, bake sales, or afternoon snacking. The soft white coconut center is coated in a smooth layer of chocolate, creating the perfect contrast between creamy sweetness and rich chocolate flavor.
These bars are especially convenient because they require simple ingredients and do not involve complicated decorating. Once the coconut mixture is shaped and chilled, the bars are dipped or coated in melted chocolate and allowed to set. The finished treats look impressive enough for a special occasion, but they are easy enough to make whenever a sweet craving hits.
Why You’ll Love This Recipe
There is something irresistible about the combination of coconut and chocolate. The coconut filling is sweet, tender, and slightly chewy, while the chocolate coating adds a rich flavor and a satisfying bite.
This recipe is also:
- Easy to prepare
- Made with simple ingredients
- Perfect for holidays and gatherings
- Great for making ahead
- Easy to customize
- Delicious served chilled or at room temperature
If you enjoy coconut candy or chocolate-covered desserts, these homemade bars may quickly become a favorite.
Ingredients
For the Coconut Filling
- 4 cups sweetened shredded coconut
- 1 can (14 ounces) sweetened condensed milk
- 1 teaspoon vanilla extract
- 2 tablespoons butter, melted
- 1/4 teaspoon salt
- 2 tablespoons powdered sugar, optional, for extra sweetness
For the Chocolate Coating
- 3 cups semi-sweet or milk chocolate chips
- 1 tablespoon coconut oil or shortening
- 1 teaspoon vanilla extract, optional
You can use milk chocolate for a sweeter, softer flavor or semi-sweet chocolate for a richer contrast with the coconut filling.
How to Make Chocolate-Covered Coconut Bars
Step 1: Prepare the Coconut Mixture
Begin by lining a baking sheet or large tray with parchment paper. This will make it much easier to remove the coconut bars later.
In a large mixing bowl, combine the sweetened shredded coconut, sweetened condensed milk, melted butter, vanilla extract, and salt. Stir everything together until the coconut is evenly coated and the mixture becomes thick and sticky.
If you prefer a sweeter dessert, add a couple of tablespoons of powdered sugar. Taste the mixture before adding it because sweetened condensed milk and sweetened coconut are already quite sweet.
The coconut mixture should be moist enough to hold together when pressed but not so wet that it becomes difficult to shape.
Step 2: Shape the Bars
Transfer the coconut mixture to the prepared parchment-lined tray. Press it firmly into an even layer using the back of a spoon, a spatula, or lightly greased hands.
For the shape shown in the photo, divide the mixture into small portions and shape each one into a short rectangular bar. Try to make the pieces similar in size so they look uniform and chill evenly.
You can make the bars as large or small as you like. Smaller pieces are perfect for dessert platters, while larger bars make a more substantial treat.
Once all the coconut mixture has been shaped, place the tray in the refrigerator for at least 1 hour. Chilling helps the coconut bars become firm enough to dip into chocolate without falling apart.
For an even firmer texture, you can chill them for 2 hours or place them in the freezer for about 20–30 minutes.
Step 3: Melt the Chocolate
While the coconut bars are chilling, prepare the chocolate coating.
Place the chocolate chips and coconut oil in a microwave-safe bowl. Microwave in 20–30 second intervals, stirring well after each interval. Continue until the chocolate is almost completely melted, then stir until smooth.
Be careful not to overheat the chocolate. Chocolate can become thick or grainy if it gets too hot.
You can also melt the chocolate using a double-boiler method. Place the bowl over a saucepan containing a small amount of gently simmering water, making sure the bottom of the bowl does not touch the water. Stir until the chocolate becomes smooth and glossy.
Add vanilla extract if desired and stir well.
Step 4: Coat the Coconut Bars
Remove the chilled coconut bars from the refrigerator.
Using a fork, dipping tool, or two small spoons, carefully dip each coconut bar into the melted chocolate. Turn it gently so that the chocolate covers the outside.
Allow any excess chocolate to drip back into the bowl before placing the coated bar onto a parchment-lined tray or cooling rack.
Continue until all of the coconut bars are covered.
If the coconut pieces feel soft while you are working, return them to the refrigerator for another 15–20 minutes. Keeping the filling cold makes dipping much easier.
Step 5: Add a Simple Decorative Finish
For a homemade bakery-style appearance, you can leave the chocolate coating plain or decorate the tops while the chocolate is still soft.
Try sprinkling a little shredded coconut over the top. You can also drizzle the bars with a contrasting chocolate color after the first coating has set.
A few light chocolate lines across the tops can make these simple bars look especially attractive on a dessert table.
Step 6: Let the Chocolate Set
Place the finished bars in the refrigerator for about 20–30 minutes, or until the chocolate coating is completely firm.
Once set, transfer the bars to an airtight container.
For the best texture, allow them to sit at room temperature for a few minutes before serving. This gives the coconut filling a softer bite while keeping the chocolate coating deliciously firm.
Helpful Tips for Perfect Coconut Bars
Use finely shredded coconut: Finely shredded coconut gives the filling a smoother texture and makes the bars easier to shape.
Chill before dipping: This is one of the most important steps. Cold coconut bars are much easier to handle and are less likely to crumble when covered with chocolate.
Do not overheat the chocolate: Melt it slowly and stir frequently for a smooth coating.
Keep the sizes consistent: Similar-sized bars will look more professional and make serving easier.
Use parchment paper: It prevents the chocolate from sticking to the tray and makes cleanup much easier.
Make them ahead: These bars are excellent for preparing a day or two before a party or holiday gathering.
Storage
Store the Chocolate-Covered Coconut Bars in an airtight container. They can be kept in the refrigerator for up to one week.
If stacking the bars, place a sheet of parchment or wax paper between the layers to prevent them from sticking together.
You can also freeze the finished bars for longer storage. Place them in a freezer-safe container with parchment paper between the layers. Freeze for up to 2–3 months. Thaw them in the refrigerator before serving.
Easy Variations
There are several ways to customize this recipe. Try using dark chocolate for a more intense flavor or white chocolate for a sweeter, creamy coating.
You can also add finely chopped almonds, pecans, or toasted coconut to the filling. A tiny amount of almond extract can give the bars a delicious bakery-style flavor.
For a festive version, add colorful sprinkles, crushed nuts, or a chocolate drizzle on top. During the holidays, these bars look beautiful arranged on a cookie platter alongside other homemade treats.
Serving Suggestions
These coconut bars are delicious with coffee, tea, hot chocolate, or a cold glass of milk. Serve them as an afternoon snack, after-dinner dessert, or part of a holiday sweets platter.
They also make a lovely homemade gift. Place several bars into a decorative box or treat bag, add a ribbon, and you have an inexpensive homemade dessert that friends, family, and coworkers will love.
Final Thoughts
These Chocolate-Covered Coconut Bars prove that you don’t need complicated ingredients or advanced baking skills to make an impressive homemade dessert. The combination of sweet coconut filling and smooth chocolate coating is classic, satisfying, and incredibly easy to love.
Once you make them, don’t be surprised if everyone asks for the recipe! They are simple enough for a casual weekend treat but pretty enough to serve at holidays, parties, and special gatherings. Keep a batch chilled in the refrigerator, and you’ll always have a delicious little chocolate-and-coconut treat ready whenever the craving strikes.