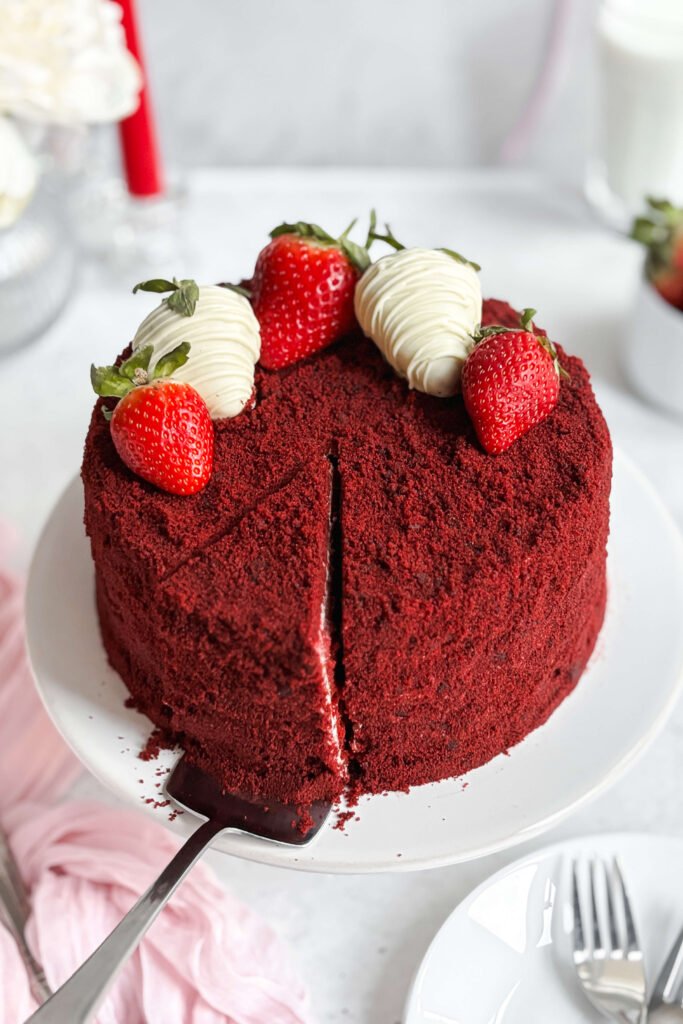

This Strawberry Red Velvet Cake is a beautiful, rich, and elegant dessert that is perfect for birthdays, holidays, Valentine’s Day, anniversaries, or any special celebration. The cake has the classic deep red color and soft, tender crumb of a traditional red velvet cake, while fresh strawberries and creamy white chocolate add a deliciously sweet finishing touch.
The cake is made with layers of moist red velvet sponge, a smooth cream cheese frosting, and fresh strawberries. The top is decorated with whole strawberries dipped in white chocolate, creating a stunning presentation without requiring complicated decorating skills. The result is a bakery-style cake that looks impressive on a dessert table but is surprisingly easy to make at home.
The slight tang from buttermilk and cream cheese balances the sweetness of the cake and chocolate, while the fresh strawberries bring a bright, fruity flavor to every bite.
Ingredients
For the Red Velvet Cake
- 2 1/2 cups all-purpose flour
- 1 1/2 cups granulated sugar
- 1 teaspoon baking soda
- 1 teaspoon salt
- 1 tablespoon unsweetened cocoa powder
- 1 1/2 cups buttermilk, room temperature
- 1 1/2 cups vegetable oil
- 2 large eggs, room temperature
- 2 teaspoons vanilla extract
- 1 teaspoon white vinegar
- 1 to 2 tablespoons red gel food coloring
For the Cream Cheese Frosting
- 16 ounces cream cheese, softened
- 1 cup unsalted butter, softened
- 4 cups powdered sugar
- 2 teaspoons vanilla extract
- 2 to 3 tablespoons heavy cream or milk, if needed
For the Strawberry Topping
- 10 to 12 fresh strawberries
- 6 ounces white chocolate or white chocolate melting wafers
- 1 teaspoon vegetable shortening or coconut oil, optional
Instructions
Step 1: Prepare the Cake Pans
Preheat your oven to 350°F (175°C). Grease three 8-inch round cake pans and line the bottoms with parchment paper. Lightly dust the sides with flour.
Preparing the pans properly makes it much easier to remove the delicate red velvet layers after baking.
Step 2: Mix the Dry Ingredients
In a large bowl, whisk together the flour, granulated sugar, baking soda, salt, and cocoa powder.
Red velvet cake traditionally uses only a small amount of cocoa powder. The goal is not to create a strong chocolate cake but rather to add a subtle cocoa flavor that complements the vanilla and buttermilk.
Set the dry mixture aside while you prepare the wet ingredients.
Step 3: Combine the Wet Ingredients
In another large bowl, whisk together the buttermilk, vegetable oil, eggs, vanilla extract, vinegar, and red food coloring.
Mix until everything is smooth and evenly combined. Using gel food coloring gives the cake a vibrant red color without adding too much extra liquid.
Step 4: Make the Batter
Gradually add the dry ingredients to the wet ingredients. Mix gently until just combined.
Do not overmix the batter. Overmixing can develop too much gluten and make the cake heavier instead of soft and tender.
The finished batter should be smooth and brightly colored.
Step 5: Bake the Cake
Divide the batter evenly among the prepared cake pans.
Bake for approximately 22 to 28 minutes, or until a toothpick inserted into the center of each cake comes out clean or with a few moist crumbs attached.
Keep an eye on the cakes toward the end of baking because oven temperatures can vary.
Remove the pans from the oven and allow the cakes to cool for about 10 minutes. Carefully remove the layers from the pans and transfer them to a wire rack to cool completely.
The cakes must be completely cool before frosting. Warm cake can cause the cream cheese frosting to melt and slide.
Step 6: Prepare the Cream Cheese Frosting
While the cake cools, prepare the frosting.
Beat the softened cream cheese and butter together with an electric mixer until completely smooth and creamy.
Gradually add the powdered sugar, about one cup at a time, mixing on low speed at first to prevent powdered sugar from flying everywhere. Add the vanilla extract and continue beating until the frosting is fluffy.
If the frosting seems too thick, add one tablespoon of heavy cream or milk at a time until you reach a smooth, spreadable consistency.
If the frosting is too soft, refrigerate it for 15 to 20 minutes before assembling the cake.
Step 7: Prepare the Strawberries
Wash the strawberries thoroughly and dry them completely with paper towels.
This step is especially important before dipping them in white chocolate. Any moisture on the berries can cause the chocolate to become thick or seize.
Melt the white chocolate in a microwave-safe bowl in 15- to 20-second intervals, stirring well after each interval. Continue until smooth.
If necessary, stir in a small amount of coconut oil or vegetable shortening to make the chocolate smoother and easier to dip.
Hold each strawberry by the leafy top and dip it into the melted white chocolate. Allow excess chocolate to drip back into the bowl.
Place the dipped strawberries on parchment paper and allow the chocolate to set. For faster results, place them in the refrigerator for several minutes.
For an extra decorative finish, drizzle a little additional melted white chocolate over the strawberries using a spoon or piping bag.
Step 8: Assemble the Cake
Once the cake layers are completely cool, place the first red velvet layer on a cake stand or serving plate.
Spread a generous layer of cream cheese frosting evenly across the top.
Place the second cake layer on top and gently press it down so the cake is level. Add another layer of frosting.
Place the final cake layer on top.
Cover the entire cake with a thin layer of frosting. This first layer is called a crumb coat and helps keep red velvet crumbs from appearing throughout the final frosting.
Refrigerate the cake for about 20 to 30 minutes.
Then apply the remaining frosting around the top and sides of the cake. You can make the surface perfectly smooth or create a slightly rustic texture with a cake spatula.
Step 9: Decorate the Cake
Arrange the white chocolate-covered strawberries and fresh strawberries around the top of the cake.
For a look similar to the pictured cake, place several strawberries around the edges and toward the center. The contrast between the deep red cake, bright red strawberries, and creamy white chocolate makes the dessert especially eye-catching.
You can also add white chocolate shavings, small red velvet crumbs, or a few swirls of cream cheese frosting for extra decoration.
Tips for the Perfect Red Velvet Cake
Use room-temperature ingredients: Room-temperature eggs, buttermilk, cream cheese, and butter combine more easily and create a smoother batter and frosting.
Do not overmix: Mix the cake batter only until the ingredients are incorporated. This helps keep the cake soft.
Cool completely: Never frost warm cake. Allow each layer to cool completely before assembling.
Dry the strawberries: Strawberries must be completely dry before dipping them in white chocolate.
Chill before serving: Refrigerating the assembled cake for at least 30 minutes helps the frosting firm up and makes slicing easier.
Use gel food coloring: Gel coloring generally provides a deeper red color than liquid food coloring without requiring a large amount.
How to Store Strawberry Red Velvet Cake
Because the cake contains cream cheese frosting and fresh strawberries, it should be stored in the refrigerator. Keep it covered in a cake container or loosely covered with plastic wrap.
It is best enjoyed within 3 to 4 days. For the best texture and flavor, allow individual slices to sit at room temperature for about 15 to 20 minutes before serving.
If you are preparing the cake ahead of time, the red velvet layers can be baked a day in advance. Wrap the cooled layers tightly in plastic wrap and refrigerate them until you are ready to assemble the cake.
Serving Suggestions
Serve this beautiful red velvet cake chilled or slightly softened at room temperature. Pair each slice with fresh strawberries, a drizzle of melted white chocolate, or a small spoonful of whipped cream.
This cake is especially lovely for Valentine’s Day, Christmas, birthdays, bridal showers, baby showers, anniversaries, and dinner parties. The dramatic red color makes it a centerpiece dessert that is sure to attract attention.
Final Thoughts
This Strawberry Red Velvet Cake with White Chocolate Strawberries combines everything you want in a special-occasion dessert: a soft and moist red velvet cake, creamy tangy frosting, juicy strawberries, and sweet white chocolate.
It may look like an elaborate bakery creation, but the decorating technique is simple enough for a home baker. The fresh strawberries provide a beautiful natural finish, while the white chocolate gives the cake an elegant touch.
Every slice delivers a delicious combination of rich red velvet, creamy frosting, fresh strawberry flavor, and sweet white chocolate. Whether you make it for a celebration or simply want an impressive homemade dessert, this cake is guaranteed to make the occasion feel extra special.
Prep Time: 30 minutes
Bake Time: 25 minutes
Cooling & Assembly: 45 minutes
Total Time: About 1 hour 40 minutes
Servings: 10–12 slices
Course: Dessert
Cuisine: American
Would you like the next version to be more SEO-friendly or more Pinterest-style?