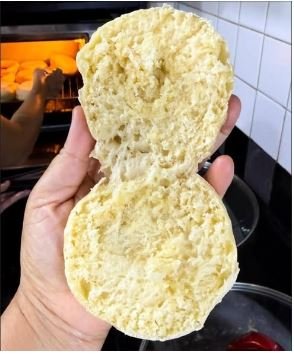

If you love soft, fluffy bread with a tender crumb and a beautiful golden crust, these Soft & Fluffy Homemade Sandwich Buns are a must-try. They are light, airy, slightly chewy, and perfect for burgers, sandwiches, breakfast toast, or simply enjoying warm with butter.
The photo shows a wonderfully soft interior with plenty of tiny air pockets, which is exactly what makes a homemade bun so satisfying. Unlike many store-bought buns, these homemade rolls are fresh, fragrant, and can be made with simple ingredients you probably already have in your kitchen.
This recipe is designed to produce buns that are soft enough to bite into easily but sturdy enough to hold your favorite sandwich fillings. The dough is enriched with milk, butter, and a little sugar, giving the finished buns a delicate texture and subtle sweetness.
Why You’ll Love These Homemade Buns
There are plenty of reasons to make your own sandwich buns at home. First, homemade bread tastes noticeably fresher than packaged bread. The aroma alone while these buns are baking is enough to make your kitchen feel like a bakery.
These buns are also incredibly versatile. Use them for juicy burgers, chicken sandwiches, breakfast egg sandwiches, pulled meat, deli sandwiches, or even as dinner rolls.
The dough is also forgiving. Once you understand how it should look and feel, you can easily make these buns again and adjust their size according to how you plan to use them.
Ingredients
For the Dough
- 3 ½ cups all-purpose flour or bread flour
- 2 ¼ teaspoons active dry yeast
- 2 tablespoons granulated sugar
- 1 teaspoon salt
- 1 cup warm milk
- 1 large egg
- 3 tablespoons unsalted butter, softened
- 2 tablespoons warm water, if needed
For the Topping
- 1 egg
- 1 tablespoon water
- Sesame seeds, optional
Step 1: Activate the Yeast
Start by warming the milk. It should feel warm but not hot. Very hot liquid can damage the yeast, while liquid that is too cool may take much longer to activate it.
Pour the warm milk into a large mixing bowl and add the sugar and yeast. Stir gently and allow the mixture to sit for about 5–10 minutes.
When the yeast is ready, you should notice some bubbles or foam on the surface. This is a good sign that the yeast is active.
If you are using instant yeast, you can also mix it directly with the flour without waiting for it to foam, but allowing it to activate first can help you confirm that your yeast is working properly.
Step 2: Make the Dough
Add the egg, softened butter, and salt to the yeast mixture. Stir until combined.
Gradually add the flour, about half a cup at a time, mixing after each addition. As the dough becomes thicker, you can begin mixing with your hands or use the dough hook attachment of a stand mixer.
Continue adding flour until you have a soft dough. Avoid adding too much flour. The dough should feel slightly tacky but should not be extremely sticky.
This is one of the most important parts of making soft bread. A dough that is overloaded with flour can produce heavy, dry buns instead of the light and fluffy texture you want.
Step 3: Knead the Dough
Transfer the dough to a lightly floured surface and knead for approximately 8–10 minutes.
You can also knead it in a stand mixer for about 6–8 minutes using the dough hook.
As you knead, the dough should become smoother, softer, and more elastic. If it feels very sticky, add a small amount of flour, but add it gradually.
A properly kneaded dough should stretch without immediately tearing. This elasticity comes from gluten development and helps create the beautiful airy structure inside the finished buns.
Place the dough into a lightly greased bowl and turn it once so the surface is lightly coated.
Step 4: Let the Dough Rise
Cover the bowl with plastic wrap, a clean kitchen towel, or a reusable cover.
Place it somewhere warm and allow the dough to rise for approximately 1–1 ½ hours, or until it has doubled in size.
The exact rising time depends on the temperature of your kitchen. On a warm day, the dough may rise faster. In a cooler kitchen, it may take longer.
Do not focus only on the clock. The most important sign is that the dough has noticeably increased in size.
Step 5: Shape the Buns
Once the dough has doubled, gently press it down to release excess air.
Transfer it to a lightly floured work surface and divide it into 8 equal portions for medium-sized sandwich buns.
For larger burger-style buns, divide the dough into 6 pieces.
Shape each portion into a smooth ball. To do this, gently pull the edges of the dough toward the center and then turn it over so the smooth side is facing upward.
Place the shaped buns onto a parchment-lined baking sheet, leaving enough space between each one for them to expand.
Gently flatten each ball with your palm if you prefer a wider sandwich bun.
Step 6: Second Rise
Cover the shaped buns loosely with a clean kitchen towel and allow them to rise again for about 30–45 minutes.
This second rise is important because it gives the buns their light, airy texture.
The buns should look noticeably puffier before they go into the oven.
While they are rising, preheat your oven to 375°F (190°C).
Step 7: Add the Egg Wash
In a small bowl, whisk together one egg and one tablespoon of water.
Once the buns have finished their second rise, gently brush the tops with the egg wash.
The egg wash helps create a beautiful golden-brown finish while also giving the buns a slightly glossy appearance.
If you like sesame-topped buns, sprinkle sesame seeds over the egg wash.
You can also leave them plain for a simple homemade sandwich roll.
Step 8: Bake
Place the baking sheet in the preheated oven and bake for approximately 16–20 minutes, or until the buns are golden brown on top.
Keep an eye on them during the final few minutes because ovens can vary.
When the buns are finished, remove them from the oven and transfer them to a wire rack.
For an especially soft crust, lightly brush the hot buns with melted butter immediately after baking.
Allow them to cool for at least 15–20 minutes before slicing. They will continue to set as they cool, while the inside remains soft and fluffy.
Tips for Extra-Fluffy Buns
Use warm—not hot—milk. Extremely hot milk can kill the yeast.
Don’t over-flour the dough. A slightly soft and tacky dough usually produces a lighter bun.
Knead thoroughly. Proper kneading develops the gluten needed for an airy crumb.
Give the dough enough time to rise. If the dough has not doubled, give it more time rather than rushing the process.
Avoid overbaking. Once the buns are nicely golden brown, they are usually ready.
Brush with butter after baking. This adds flavor and helps keep the crust soft.
How to Store Homemade Buns
Once completely cooled, place the buns in an airtight container or resealable bag. They can be kept at room temperature for approximately 2–3 days.
For longer storage, freeze the buns individually or in a freezer-safe bag for up to 2–3 months.
When you’re ready to enjoy them, allow them to thaw at room temperature. You can warm them briefly in the oven or microwave to bring back that fresh-baked softness.
Serving Ideas
These homemade buns are incredibly versatile. Slice them in half and fill them with grilled chicken, crispy chicken, burgers, pulled pork, deli meats, cheese, lettuce, tomatoes, and your favorite sauces.
For breakfast, use them with scrambled eggs, cheese, sausage, or bacon.
They are also delicious simply toasted with butter, jam, honey, or cream cheese.
For dinner, serve smaller versions alongside soups, stews, roasted chicken, or pasta.
Final Thoughts
Making homemade sandwich buns may seem intimidating at first, but once you make them successfully, you’ll realize how simple the process can be. The combination of basic ingredients, proper kneading, and enough rising time creates wonderfully soft buns with a delicate crumb and fresh-baked flavor.
The best part is cutting into a freshly baked bun and seeing that soft, airy interior. These Soft & Fluffy Homemade Sandwich Buns are perfect for everyday meals and special weekend cooking alike.
Once you try homemade buns, you may find yourself making them regularly instead of reaching for packaged bread. They are fresher, more flavorful, and can easily be customized to suit your family’s favorite sandwiches.
Recipe at a Glance
Prep Time: 20 minutes
Rise Time: 1 ½–2 hours
Bake Time: 16–20 minutes
Total Time: About 2 ½ hours
Servings: 8 buns
Oven Temperature: 375°F (190°C)
For your website, I’d use the title “Soft & Fluffy Sandwich Buns.”
Would you like the next one in classic recipe style or SEO-friendly blog style?