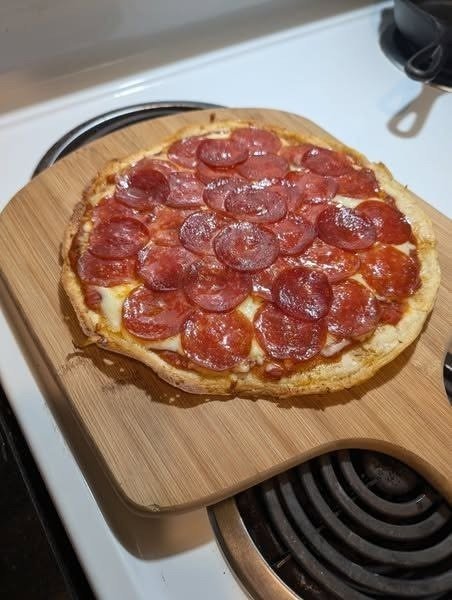

There is nothing quite like a homemade pepperoni pizza fresh from the oven. With a golden, crispy crust, flavorful pizza sauce, gooey melted mozzarella cheese, and plenty of savory pepperoni, this classic pizza is the perfect comfort food for family dinners, weekend gatherings, game nights, or a casual meal at home. Making pizza from scratch may seem intimidating, but this easy recipe keeps the process simple while delivering delicious, pizzeria-style results.
The best part about homemade pizza is that you can customize it exactly the way you like. Add extra cheese, more pepperoni, a sprinkle of Italian seasoning, or your favorite vegetables. Once you learn this basic recipe, you can use it as a starting point for countless homemade pizza creations.
Why You’ll Love This Pepperoni Pizza
This homemade pepperoni pizza is easy, satisfying, and made with simple ingredients. The crust becomes beautifully golden around the edges while staying soft and chewy in the center. The tomato sauce adds a rich and slightly tangy flavor, while melted mozzarella creates the classic cheesy layer everyone loves.
Pepperoni is the star of this recipe. As it bakes, the slices become slightly crispy around the edges and release their flavorful oils over the cheese, giving the pizza an irresistible taste and appearance.
It is also much more affordable than ordering delivery, and you can make the pizza as large, small, thick, or thin as you prefer.
Ingredients
For the Pizza Dough
- 2 ¼ teaspoons active dry yeast
- 1 teaspoon granulated sugar
- 1 cup warm water
- 2 ½ cups all-purpose flour
- 1 teaspoon salt
- 2 tablespoons olive oil
For the Pizza Topping
- ½ to ¾ cup pizza sauce
- 2 cups shredded mozzarella cheese
- 25–35 slices pepperoni
- 1 tablespoon grated Parmesan cheese, optional
- ½ teaspoon Italian seasoning
- ¼ teaspoon garlic powder
- 1 tablespoon olive oil
- Crushed red pepper flakes, optional
How to Make Homemade Pepperoni Pizza
Step 1: Prepare the Dough
Start by making the pizza dough. Pour the warm water into a large mixing bowl. The water should feel warm but not hot. Add the sugar and active dry yeast, then gently stir.
Let the mixture sit for about 5–10 minutes. The yeast should become foamy on the surface. This is a good indication that the yeast is active and ready to use.
Add the flour, salt, and olive oil to the bowl. Stir everything together until a rough dough begins to form.
Transfer the dough to a lightly floured surface and knead it for approximately 6–8 minutes. The dough should become smooth and elastic. If it feels extremely sticky, add a little more flour, one tablespoon at a time.
Place the dough in a lightly oiled bowl and cover it with a clean kitchen towel or plastic wrap. Allow it to rise in a warm place for about 1 hour, or until it has doubled in size.
Step 2: Prepare the Oven
While the dough is rising, preheat your oven to 475°F (245°C).
A very hot oven is important for homemade pizza because it helps the crust become crisp and golden while melting the cheese quickly.
If you have a pizza stone or pizza steel, place it in the oven while it preheats. If not, a heavy baking sheet or pizza pan works perfectly well.
Step 3: Shape the Dough
Once the dough has doubled in size, gently punch it down to remove excess air.
Place it on a lightly floured surface and roll or stretch it into a round pizza shape. Aim for approximately 12 inches in diameter.
For a thinner and crispier crust, stretch the dough more thinly. If you prefer a thicker, softer crust, leave it slightly thicker around the center and edges.
Transfer the dough to a lightly greased pizza pan, parchment paper, or a preheated pizza stone.
Step 4: Add the Sauce
Spread the pizza sauce evenly over the dough, leaving about ½ inch around the edges for the crust.
Avoid adding too much sauce. A thin, even layer is enough to provide plenty of tomato flavor without making the crust soggy.
For extra flavor, sprinkle a small amount of Italian seasoning and garlic powder over the sauce.
Step 5: Add the Cheese
Sprinkle the shredded mozzarella evenly over the pizza sauce.
Make sure the cheese reaches most areas of the pizza, but don’t completely cover the outer edge. Leaving a little space creates a beautiful golden crust.
For an even richer flavor, add a light sprinkle of Parmesan cheese over the mozzarella.
Step 6: Add the Pepperoni
Arrange the pepperoni slices over the cheese.
You can place them close together if you love lots of pepperoni, or leave a little space between each slice. As the pizza cooks, the pepperoni will shrink slightly and become beautifully browned around the edges.
For an extra cheesy and meaty pizza, feel free to add additional mozzarella and pepperoni.
Step 7: Bake the Pizza
Place the prepared pizza into the preheated oven.
Bake for approximately 12–16 minutes, depending on the thickness of your crust and the temperature of your oven.
The pizza is ready when the cheese is completely melted and bubbling, the pepperoni is lightly crisp around the edges, and the crust is golden brown.
If you prefer an extra-crispy top, you can switch the oven to broil for the final 1–2 minutes. Watch it carefully because the cheese and pepperoni can brown very quickly.
Step 8: Finish and Serve
Remove the pizza from the oven and let it rest for about 5 minutes before slicing.
Brush the crust lightly with olive oil for a delicious finishing touch. You can also sprinkle Italian seasoning, Parmesan cheese, or crushed red pepper flakes over the top.
Use a sharp pizza cutter to cut the pizza into slices and serve while it is warm.
Tips for the Best Homemade Pizza
Use fresh yeast: Fresh, active yeast helps create a light and flavorful crust. If your yeast does not become foamy in the warm water, it may no longer be active.
Do not overload the pizza: Too many toppings can make the pizza heavy and prevent the crust from becoming crispy. Keep the sauce, cheese, and toppings balanced.
Use a hot oven: A high baking temperature is one of the secrets to getting a crisp, golden crust.
Choose good mozzarella: Freshly shredded mozzarella melts beautifully and gives the pizza a creamy, stretchy texture.
Let the dough rest: Allowing the dough enough time to rise gives it better flavor and texture.
Watch the pepperoni: Pepperoni can become quite crispy around the edges. If you prefer softer pepperoni, use slightly fewer slices or place some underneath the cheese.
Easy Variations
Although classic pepperoni pizza is hard to beat, you can easily change this recipe to suit your taste.
Add sliced mushrooms, bell peppers, onions, black olives, or jalapeños for extra flavor. You can also add cooked sausage, bacon, or ham for a meat-lover’s pizza.
For a spicy version, add crushed red pepper flakes or sliced jalapeños. If you enjoy a garlic flavor, brush the crust with garlic butter immediately after baking.
You can even make individual mini pizzas by dividing the dough into smaller portions before shaping.
How to Store Leftover Pizza
If you have leftovers, allow the pizza to cool completely before placing the slices in an airtight container. Store them in the refrigerator for up to 3–4 days.
To reheat, place the pizza in a skillet over medium-low heat and cover it with a lid. This helps make the crust crispy while melting the cheese again.
You can also reheat slices in an oven or air fryer for a crispier result. Avoid microwaving for too long because it can make the crust soft and chewy.
Final Thoughts
Homemade Pepperoni Pizza is an easy recipe that brings classic pizzeria flavor straight to your kitchen. The combination of homemade dough, rich tomato sauce, melted mozzarella, and crispy pepperoni makes every bite delicious.
Whether you’re preparing dinner for your family or making a fun weekend meal, this pizza is sure to become a favorite. Once you’ve mastered the basic dough and baking method, you can experiment with different sauces, cheeses, and toppings to create your own signature pizza.
Serve it hot with a fresh salad, garlic bread, or your favorite dipping sauce, and enjoy a comforting homemade meal that tastes even better than takeout.
Would you like your next recipe in a more SEO-focused style or a simple food-blog style?