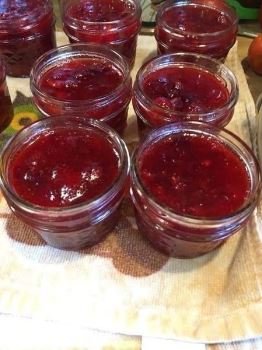

There is nothing quite like the flavor of homemade Berry Jam spread over warm toast in the morning. This easy recipe creates a beautiful ruby-red jam packed with sweet berry flavor and a slightly tangy finish. The jam has a thick, glossy texture with little pieces of fruit throughout, just like the jars shown in the picture.
Homemade jam is surprisingly simple to make. You only need a few ingredients and a saucepan to transform fresh berries into a delicious spread that can be enjoyed with toast, biscuits, pancakes, waffles, yogurt, cakes, and much more.
You can make this recipe with strawberries, raspberries, blackberries, blueberries, or a combination of your favorite berries. It is a wonderful way to use seasonal fruit and makes a lovely homemade gift for family and friends.
Why You’ll Love This Berry Jam
- Made with simple ingredients
- Bright, fresh berry flavor
- Beautiful naturally red color
- Thick and spreadable texture
- Perfect for breakfast
- Delicious in desserts
- Easy to customize
- Great for using fresh or frozen berries
Ingredients
- 4 cups fresh or frozen mixed berries
- 2 cups granulated sugar
- 2 tablespoons fresh lemon juice
- 1 teaspoon lemon zest, optional
- 1 teaspoon vanilla extract, optional
- 1 tablespoon water, if needed
You can use one type of berry or combine several varieties.
For a classic strawberry version, use chopped strawberries. For a more complex flavor, combine strawberries, raspberries, blueberries, and blackberries.
How to Make Homemade Berry Jam
Step 1: Prepare the Berries
If you’re using fresh berries, wash them thoroughly and allow them to drain.
Remove the stems from strawberries and cut larger strawberries into smaller pieces.
Raspberries and blackberries can be left whole. Blueberries can also be used whole.
If you’re using frozen berries, there is usually no need to thaw them completely before cooking.
Place the prepared berries in a large, heavy-bottomed saucepan.
Step 2: Add Sugar and Lemon Juice
Add the sugar and lemon juice to the berries.
Gently stir everything together.
Let the mixture sit for approximately 10–15 minutes.
During this time, the sugar will begin drawing juice from the berries. This creates a flavorful liquid that will eventually transform into the jam.
The lemon juice is important because it balances the sweetness and helps brighten the natural flavor of the fruit.
Step 3: Start Cooking
Place the saucepan over medium heat.
Cook the berries slowly, stirring occasionally.
As the fruit heats up, it will release more juice and begin to soften.
Use a wooden spoon or potato masher to gently crush some of the berries.
You don’t need to completely puree the fruit. Leaving some small pieces gives the finished jam a lovely homemade texture.
Bring the mixture to a gentle boil.
Once it begins bubbling, reduce the heat slightly.
Step 4: Simmer the Jam
Continue cooking for approximately 20–30 minutes, stirring frequently.
The mixture will gradually become thicker as excess liquid evaporates.
Keep an eye on the bottom of the pan and stir regularly to prevent the jam from sticking.
As the jam cooks, you’ll notice that the bubbles become slower and thicker. The color will also become deeper and more glossy.
If you prefer a very smooth jam, you can use an immersion blender to puree the fruit. For a chunky homemade-style jam, simply mash the berries lightly and leave some pieces intact.
Step 5: Check the Consistency
One of the most important parts of making jam is knowing when it is ready.
The jam will continue to thicken as it cools, so don’t wait for it to become extremely thick while it’s still on the stove.
A simple way to test it is the cold-plate method.
Place a small plate in the freezer before you begin cooking.
When you think the jam is ready, spoon a small amount onto the cold plate.
Wait about 30 seconds and gently push the jam with your finger.
If it wrinkles slightly and doesn’t immediately run across the plate, the jam is ready.
If it is still very liquid, continue cooking for a few more minutes and test again.
Step 6: Add Vanilla
If desired, stir in the vanilla extract and lemon zest after removing the jam from the heat.
Vanilla adds a subtle sweetness and makes the berry flavor taste richer.
Lemon zest adds a fresh citrus aroma that pairs beautifully with berries.
These ingredients are optional, so you can leave them out for a more traditional berry flavor.
Step 7: Cool the Jam
Remove the saucepan from the heat.
Allow the jam to cool for approximately 10–15 minutes.
It will become noticeably thicker as it cools.
If you notice any foam on the surface, you can gently skim it away with a spoon.
Step 8: Transfer to Jars
Spoon the warm jam into clean jars, leaving some space at the top.
Wipe the rims carefully if any jam spills.
Allow the jars to cool before covering them.
For refrigerator storage, place the cooled jars in the refrigerator.
Important: This recipe is intended as a refrigerator/freezer jam unless you are using a properly tested, safe canning recipe and procedure. Simply filling jars with hot jam and sealing them does not make them shelf-stable.
Tips for Perfect Berry Jam
Use ripe berries: Ripe fruit provides the best flavor and natural sweetness.
Don’t rush the cooking: Gentle cooking allows the fruit to break down while preserving its flavor.
Stir regularly: This prevents the jam from sticking or burning.
Don’t overcook: Very long cooking can make the jam overly thick and reduce its fresh fruit flavor.
Adjust the sweetness: If your berries are especially sweet, you can slightly reduce the sugar, although changing the sugar ratio can affect the final texture.
Use lemon juice: The acidity gives the jam a brighter flavor and balances the sugar.
Remember that jam thickens as it cools: Don’t judge the final consistency while the jam is boiling hot.
Different Berry Combinations
The beauty of homemade berry jam is that you can create your own combination.
Strawberry Jam
Use 4 cups chopped strawberries for a classic sweet and fruity spread.
Raspberry Jam
Raspberries create an intensely flavorful jam with a beautiful deep-red color.
Blackberry Jam
Blackberries provide a rich, slightly tart flavor and gorgeous dark color.
Blueberry Jam
Blueberry jam is naturally sweet and delicious with pancakes, waffles, and toast.
Mixed Berry Jam
Combine strawberries, raspberries, blueberries, and blackberries for a flavorful mixed-berry version.
How to Use Homemade Berry Jam
There are so many delicious ways to enjoy this jam.
Spread it over:
- Toast
- English muffins
- Biscuits
- Croissants
- Pancakes
- Waffles
- Scones
- French toast
You can also swirl it into plain or vanilla yogurt for an easy breakfast.
For dessert, spoon it over cheesecake, ice cream, pound cake, or vanilla pudding.
Another delicious idea is to use it as a filling between cake layers or inside homemade cookies.
Berry Jam and Peanut Butter Sandwich
For a quick and comforting lunch, spread homemade berry jam over one slice of bread and peanut butter over another.
Put the slices together and enjoy.
The fresh berry flavor makes a classic peanut butter and jam sandwich taste even better.
How to Store Berry Jam
Because this is a refrigerator-style jam, keep it refrigerated after cooling.
Store it in clean, airtight jars and use a clean spoon each time you serve it.
For longer storage, the jam can be frozen in freezer-safe containers. Leave enough headspace for expansion as it freezes.
Thaw frozen jam in the refrigerator before using.
The exact storage life depends on preparation, cleanliness, ingredients, and refrigeration conditions, so discard the jam if you notice mold, fermentation, an unusual smell, or other signs of spoilage.
Frequently Asked Questions
Can I use frozen berries?
Yes. Frozen berries work very well. They are especially convenient when fresh berries are out of season.
Can I make this jam without pectin?
Yes. Many berry jams can thicken naturally through cooking because berries contain natural pectin. The final consistency will depend on the fruit, sugar, acidity, and cooking time.
Why is my jam too thin?
It may need a little more cooking time. Return it to the saucepan and simmer gently for several additional minutes, then test the consistency again.
Why did my jam become too thick?
It may have been cooked for too long. Try stirring in a small amount of water and gently warming the jam until the desired consistency is reached.
Can I reduce the sugar?
You can experiment with the amount, but sugar contributes to sweetness, texture, and preservation. For a reliable result, follow a tested recipe if you plan to can the jam for room-temperature storage.
Final Thoughts
This Homemade Berry Jam is an easy and delicious way to turn fresh fruit into something truly special. The beautiful red color, glossy texture, and naturally sweet-tart berry flavor make it perfect for everything from a simple slice of toast to elegant desserts.
Once you make homemade jam, you’ll appreciate how much better fresh fruit can taste compared with many store-bought spreads. Make a batch during berry season, keep it refrigerated for everyday breakfasts, or freeze some so you can enjoy that fresh berry flavor later.
Whether you spread it on warm bread, spoon it over pancakes, swirl it into yogurt, or use it as a dessert filling, this homemade berry jam is a simple recipe that deserves a place in your kitchen.