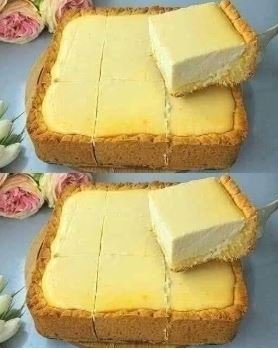

These Creamy Cheesecake Bars are a simple yet delicious dessert with a buttery golden crust and a rich, smooth cheesecake layer. They have a beautiful homemade appearance, with a soft, creamy center and lightly golden edges that make every slice irresistible.
If you love classic cheesecake but don’t want to deal with a complicated springform pan or a water bath, this recipe is a wonderful option. Everything is baked in a square pan, chilled, and cut into neat bars. The result is a dessert that is perfect for family gatherings, afternoon tea, holidays, potlucks, or simply satisfying a cheesecake craving at home.
The texture is wonderfully creamy without being overly heavy. The slightly crisp crust provides the perfect contrast to the smooth cheesecake filling.
Why You’ll Love These Cheesecake Bars
- Easy to prepare
- No complicated decorating required
- Rich and creamy texture
- Buttery homemade crust
- Perfectly portioned into squares
- Great for parties and gatherings
- Can be made ahead of time
- Delicious served plain or with toppings
Ingredients
For the Crust
- 2 cups all-purpose flour
- ½ cup granulated sugar
- ½ cup unsalted butter, softened
- 1 large egg yolk
- 1 teaspoon vanilla extract
- ¼ teaspoon salt
For the Cheesecake Filling
- 16 ounces full-fat cream cheese, softened
- ¾ cup granulated sugar
- 3 large eggs
- 1 cup sour cream
- 1 teaspoon vanilla extract
- 2 tablespoons all-purpose flour
- 1 tablespoon lemon juice
- Pinch of salt
Optional Toppings
- Powdered sugar
- Fresh berries
- Strawberry sauce
- Blueberry sauce
- Whipped cream
- Lemon zest
- Fresh fruit
How to Make Creamy Cheesecake Bars
Step 1: Prepare the Baking Pan
Preheat your oven to 350°F (175°C).
Grease a 9-by-9-inch square baking pan. Line the bottom and sides with parchment paper, leaving a little extra parchment hanging over the sides.
The overhanging parchment will make it much easier to lift the chilled cheesecake out of the pan later.
For thicker bars like the ones shown in the picture, an 8-inch square pan can also be used. The smaller pan will create a taller cheesecake layer.
Step 2: Make the Crust
Add the softened butter and sugar to a mixing bowl.
Beat until the mixture becomes smooth and creamy.
Add the egg yolk and vanilla extract and mix until combined.
Gradually add the flour and salt.
Mix until the ingredients come together and form a soft dough.
The dough should be soft but easy to press into the pan.
Step 3: Press the Crust Into the Pan
Transfer the crust mixture to the prepared baking pan.
Use your fingers, the back of a spoon, or the bottom of a measuring cup to press the dough evenly across the bottom.
Try to create an even layer so the crust bakes uniformly.
Place the pan in the preheated oven and bake for approximately 15–18 minutes, or until the edges are lightly golden.
Remove the crust from the oven and allow it to cool for several minutes while you prepare the filling.
Step 4: Prepare the Cheesecake Filling
Make sure the cream cheese is completely softened before beginning.
Add the cream cheese and sugar to a large mixing bowl.
Beat on medium speed until smooth and creamy.
Add the eggs one at a time, mixing on low speed after each addition.
Avoid overbeating the mixture because incorporating too much air can cause the cheesecake to puff up and crack during baking.
Add the sour cream, vanilla extract, lemon juice, flour, and salt.
Mix just until everything is smooth and combined.
The filling should be thick, creamy, and completely free of large lumps.
Step 5: Pour the Filling Over the Crust
Pour the cheesecake filling over the partially cooled crust.
Use a spatula to gently spread the filling into an even layer.
Tap the pan lightly against the counter once or twice to remove any large air bubbles.
Don’t tap too aggressively.
Step 6: Bake the Cheesecake
Reduce the oven temperature to 325°F (165°C).
Place the pan in the oven and bake for approximately 35–45 minutes.
The edges should look set, while the center should still have a very slight jiggle when the pan is gently moved.
Don’t wait until the center is completely firm. Cheesecake continues to set as it cools, and overbaking can make the filling dry or cause cracks.
The top should remain relatively pale with just a light golden color around the edges.
If your oven tends to brown desserts quickly, you can loosely cover the pan with aluminum foil during the final part of baking.
Step 7: Cool Slowly
When the cheesecake is finished, turn off the oven and leave the door slightly open.
Allow the cheesecake to sit inside for approximately 10–15 minutes.
Then remove the pan and place it on a wire rack.
Let it cool completely at room temperature.
Do not try to cut the cheesecake while it is still warm. The filling needs time to firm up.
Step 8: Refrigerate
Once the cheesecake has cooled, cover the pan with plastic wrap or foil.
Refrigerate for at least 4 hours, although chilling overnight will give you the best texture.
The cold temperature allows the cheesecake filling to become firm, creamy, and easy to slice.
This also makes the bars much easier to cut cleanly.
Step 9: Cut Into Bars
When ready to serve, carefully lift the cheesecake from the pan using the parchment paper.
Place it on a cutting board.
Use a sharp knife to cut it into squares or rectangles.
For cleaner cuts, dip the knife in hot water, wipe it dry, and then slice. Repeat between cuts.
This technique helps create neat, bakery-style cheesecake bars.
Add a Simple Finishing Touch
The cheesecake bars are delicious exactly as they are, but a light dusting of powdered sugar makes them look especially beautiful.
You can also add fresh strawberries, blueberries, raspberries, or a drizzle of fruit sauce.
For a special dessert, top each bar with a small spoonful of whipped cream and fresh berries.
Tips for Perfect Cheesecake Bars
Use room-temperature cream cheese. Cold cream cheese can leave lumps in the filling.
Don’t overmix the eggs. Too much air can cause the cheesecake to rise dramatically and then sink.
Bake gently. Cheesecake should be baked until the edges are set and the center still has a slight wobble.
Don’t overbake. Overbaking can result in a dry or crumbly cheesecake.
Cool gradually. Sudden temperature changes can cause cracks.
Chill completely. Refrigeration is essential for achieving the right texture.
Use parchment paper. It makes removing the finished cheesecake much easier.
Delicious Variations
One of the best things about these cheesecake bars is how easy they are to customize.
Lemon Cheesecake Bars
Add an extra tablespoon of fresh lemon juice and a teaspoon of finely grated lemon zest to the filling for a bright citrus flavor.
Berry Cheesecake Bars
Swirl a few spoonfuls of strawberry or blueberry sauce into the cheesecake before baking.
Chocolate Cheesecake Bars
Add ½ cup melted and cooled chocolate to the filling for a rich chocolate version.
Cinnamon Cheesecake Bars
Add ½ teaspoon cinnamon to the crust for a warm, comforting flavor.
Coconut Cheesecake Bars
Add ½ cup shredded coconut to the crust or filling for a tropical twist.
Serving Suggestions
These creamy cheesecake bars are wonderful served chilled.
Pair them with:
- Fresh strawberries
- Blueberries
- Raspberry sauce
- Strawberry jam
- Caramel sauce
- Chocolate sauce
- Whipped cream
- Fresh mint
- Powdered sugar
They are also delicious with a hot cup of coffee or tea.
For a dinner party, arrange the bars on a serving platter and decorate them with fresh berries. Their simple appearance makes them elegant enough for special occasions without requiring complicated decoration.
How to Store Cheesecake Bars
Because these bars contain cream cheese, eggs, and sour cream, they should be stored in the refrigerator.
Keep them in an airtight container or cover the baking pan tightly with plastic wrap.
They are best enjoyed within several days.
You can also freeze individual cheesecake bars. Wrap each piece tightly in plastic wrap and place them in a freezer-safe container or bag.
When you’re ready to enjoy them, thaw the bars overnight in the refrigerator.
Final Thoughts
These Creamy Cheesecake Bars are the perfect dessert when you want something rich, smooth, and homemade without making a complicated traditional cheesecake. The buttery golden crust pairs beautifully with the soft cream cheese filling, creating a dessert that is simple, elegant, and incredibly satisfying.
The recipe is easy enough for beginners and versatile enough to customize with your favorite fruits, sauces, or flavors. Make them ahead for a party, pack them for a potluck, or keep a batch in the refrigerator for a special treat during the week.
With their creamy center, golden crust, and neat square slices, these cheesecake bars are sure to disappear quickly whenever you serve them.