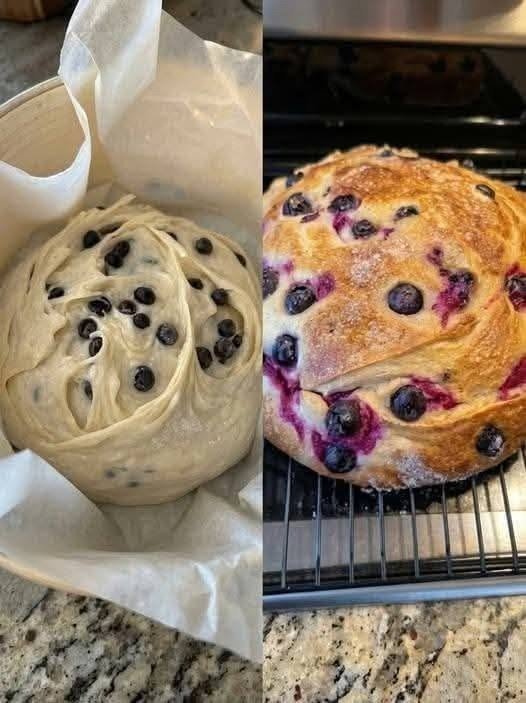

Freshly baked homemade bread is always special, but this Blueberry Sourdough Bread takes it to another level. With a beautifully golden crust, a soft and chewy interior, and juicy blueberries scattered throughout, this rustic loaf is as delicious as it is beautiful.
The loaf in the picture has the classic artisan-bread appearance, with a crisp golden crust and vibrant blueberries baked into the dough. The combination of naturally fermented sourdough and sweet blueberries creates a wonderful balance of slightly tangy and fruity flavors.
This bread is perfect for breakfast, brunch, afternoon snacks, or simply enjoying with a little butter. It also makes a beautiful homemade gift for friends and family.
Why You’ll Love This Recipe
- Beautiful rustic artisan appearance
- Crispy golden crust
- Soft and chewy center
- Sweet blueberries in every bite
- Naturally fermented sourdough flavor
- No complicated equipment required
- Delicious toasted with butter
- Perfect for breakfast or brunch
Ingredients
- 100 grams active sourdough starter
- 350 grams warm water
- 500 grams bread flour
- 10 grams salt
- 1–2 tablespoons honey or maple syrup
- 1 cup fresh blueberries
- 1 teaspoon lemon zest, optional
- 1 teaspoon vanilla extract, optional
Fresh blueberries are ideal, but frozen blueberries can also be used. If using frozen berries, don’t thaw them first because thawed berries can release too much liquid and make the dough difficult to handle.
How to Make Blueberry Sourdough Bread
Step 1: Prepare the Sourdough Starter
For the best results, make sure your sourdough starter is active and bubbly before beginning.
A healthy starter should have risen noticeably after feeding and should contain plenty of bubbles. If your starter is sluggish, give it another feeding and wait until it becomes active before making the bread.
This step is important because sourdough starter is responsible for both the rise and the characteristic flavor of the loaf.
Step 2: Mix the Dough
Add the warm water and active sourdough starter to a large mixing bowl.
Stir until the starter is mostly dissolved.
Add the bread flour and mix with your hand, wooden spoon, or dough whisk until no large patches of dry flour remain.
The dough will look rough and sticky at this stage. That’s completely normal.
Cover the bowl and let the dough rest for approximately 30–45 minutes.
This resting period, often called an autolyse, allows the flour to absorb the water and helps develop the dough’s structure.
Step 3: Add Salt and Sweetener
After the initial resting period, add the salt and honey or maple syrup.
Use wet hands to gently squeeze and fold the dough until everything is evenly incorporated.
The dough should gradually become smoother and more elastic.
If you’re adding lemon zest or vanilla, you can incorporate them at this stage as well. Lemon zest is especially delicious with blueberries because its fresh citrus flavor complements the fruit beautifully.
Step 4: Add the Blueberries
Once the dough has developed some strength, gently add the blueberries.
Be careful when mixing because fresh blueberries can burst easily.
Instead of aggressively kneading the berries into the dough, gently stretch and fold the dough around them.
Some blueberries may break slightly and create beautiful purple streaks throughout the bread. This is completely fine and can actually make the finished loaf even more attractive.
Step 5: Stretch and Fold
Cover the bowl and allow the dough to rest for about 30 minutes.
Then perform your first set of stretch-and-folds.
With slightly wet hands, grab one side of the dough, gently stretch it upward, and fold it over the center.
Turn the bowl and repeat on all four sides.
Cover and rest for another 30 minutes.
Repeat this process approximately 3–4 times during the first 2 hours of fermentation.
You should notice the dough becoming stronger, smoother, and more elastic after each set.
Try to handle the dough gently so you don’t crush the blueberries.
Step 6: Bulk Fermentation
After the stretch-and-fold process, cover the bowl and allow the dough to continue fermenting at room temperature.
This can take approximately 4–6 hours, depending on the temperature of your kitchen and the strength of your starter.
Instead of relying only on the clock, look at the dough. It should become noticeably puffier and increase in volume. You should also see bubbles developing around the edges and throughout the dough.
A warmer kitchen will generally speed up fermentation, while a cooler kitchen will slow it down.
Step 7: Shape the Loaf
Lightly flour your work surface.
Carefully turn the dough out of the bowl.
Try not to press all the air out of it.
Gently shape the dough into a round boule by folding the edges toward the center and creating surface tension.
Place the shaped loaf seam-side up into a well-floured banneton or a bowl lined with a floured kitchen towel.
Cover it.
Step 8: Cold Proof
For deeper flavor and easier handling, refrigerate the shaped dough for approximately 8–14 hours.
The cold fermentation allows the sourdough flavor to develop while also making the dough easier to score and transfer into the oven.
This overnight method is particularly convenient because you can prepare the dough in the evening and bake fresh bread the next morning.
Step 9: Prepare for Baking
When you’re ready to bake, preheat your oven to 450°F (230°C).
Place a Dutch oven inside the oven while it preheats. Allow it to heat for at least 30–45 minutes.
Carefully remove the dough from the refrigerator and turn it onto a piece of parchment paper.
Using a sharp bread lame or knife, score the top of the loaf.
A simple long slash across the top works beautifully.
You can also create a decorative pattern if you prefer.
Step 10: Bake the Bread
Carefully transfer the dough into the hot Dutch oven.
Cover with the lid and bake for approximately 25 minutes.
The covered pot traps steam, helping the bread rise and develop its signature crispy crust.
After 25 minutes, carefully remove the lid.
Continue baking uncovered for another 15–20 minutes, or until the loaf becomes deeply golden brown.
The crust should look crisp and beautifully caramelized.
If you have an instant-read thermometer, the center should generally reach around 200–210°F (93–99°C) when fully baked.
Step 11: Cool Completely
Remove the bread from the Dutch oven and place it on a wire rack.
Allow it to cool for at least 1 hour before slicing.
This is one of the hardest parts because the bread will smell incredible, but cutting it too early can make the interior gummy.
Once cooled, use a serrated knife to slice the loaf.
You’ll see the beautiful blueberries distributed throughout the soft crumb.
Tips for Perfect Blueberry Sourdough Bread
Use an active starter: A strong, bubbly starter is essential for good fermentation and rise.
Don’t overmix the blueberries: Handle them gently to prevent excessive juice from coloring the dough.
Use cold frozen blueberries if necessary: Frozen berries can be easier to incorporate without bursting.
Watch the dough, not just the clock: Fermentation time changes depending on temperature and starter activity.
Don’t skip the cold proof: Overnight refrigeration improves flavor and makes the dough easier to handle.
Preheat the Dutch oven: A very hot pot creates excellent oven spring and a crisp crust.
Let the bread cool: Cooling allows the crumb to finish setting.
Serving Suggestions
This bread is delicious all by itself, but there are countless ways to enjoy it.
Try serving toasted slices with:
- Salted butter
- Cream cheese
- Honey
- Blueberry jam
- Mascarpone
- Peanut butter
- Almond butter
- Whipped cream cheese
For breakfast, toast a thick slice and top it with butter and a drizzle of honey.
You can also use slices to make French toast. The slightly tangy sourdough flavor pairs beautifully with eggs, milk, cinnamon, and vanilla.
How to Store the Bread
Store the completely cooled loaf in a bread bag, paper bag, or bread box at room temperature.
For the best texture, enjoy it within a few days.
If you won’t finish the loaf quickly, slice it and freeze the slices in a freezer-safe bag. Place parchment paper between slices so you can remove individual pieces whenever you want.
Toast frozen slices directly in a toaster for a quick breakfast.
Final Thoughts
This Blueberry Sourdough Bread is a wonderful combination of rustic artisan bread and sweet, juicy fruit. The naturally tangy sourdough flavor balances the sweetness of the blueberries, while the golden crust provides a satisfying contrast to the soft interior.
It may require patience because sourdough needs time to ferment, but most of the process is hands-off. Once you’ve shaped the loaf and placed it in the refrigerator, the hardest part is simply waiting for it to bake.
Serve it warm with butter, toast it for breakfast, or enjoy a slice with your afternoon coffee. With its beautiful appearance and delicious homemade flavor, this blueberry sourdough loaf is a recipe you’ll want to make again and again.