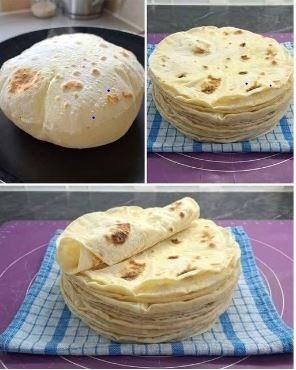

If you love soft, warm, homemade flatbreads, this easy recipe is perfect for you. These homemade flatbreads are soft, flexible, lightly golden, and delicious when served fresh from the pan. The picture shows a beautiful stack of thin flatbreads with golden-brown spots, perfect for wrapping around your favorite fillings or enjoying alongside curries, vegetables, grilled meats, and dips.
Making flatbread at home may seem difficult, but the process is surprisingly simple. With just a few basic ingredients—flour, water, salt, and a little oil—you can make a large stack of soft flatbreads in your own kitchen.
The key is preparing a smooth dough, allowing it to rest, and rolling each piece thin enough to cook quickly while keeping it soft. Once you make them at home, you may never want to rely on store-bought flatbread again!
Why You’ll Love This Recipe
- Made with simple pantry ingredients
- No special equipment required
- Soft, thin, and flexible
- Perfect for wraps and sandwiches
- Delicious with curries and stews
- Easy to make in large batches
- Can be stored for later
Ingredients
For the Dough
- 4 cups all-purpose flour
- 1 ½ teaspoons salt
- 2 tablespoons vegetable oil or olive oil
- 1 ½ to 1 ¾ cups warm water, as needed
- Extra flour for rolling
- A little oil or butter for serving, optional
You can also use whole wheat flour for a more rustic and hearty version. If using whole wheat flour, you may need a little extra water because it absorbs more liquid.
How to Make Homemade Flatbread
Step 1: Prepare the Dough
Start by adding the flour and salt to a large mixing bowl. Stir them together so the salt is evenly distributed throughout the flour.
Add the oil and mix with your fingers or a spoon. Slowly pour in the warm water while mixing. Do not add all the water at once because different types of flour absorb different amounts of liquid.
Continue mixing until a soft dough begins to form.
The dough should feel soft and smooth but should not be extremely sticky. If it feels too dry, add a tablespoon of water at a time. If it becomes too sticky, sprinkle in a little more flour.
Step 2: Knead the Dough
Transfer the dough to a lightly floured surface and knead it for about 7–10 minutes.
Kneading is important because it develops the gluten in the flour, helping the flatbreads become soft and flexible instead of dry and crumbly.
Press the dough forward with the palm of your hand, fold it back, turn it, and repeat. Continue until the dough becomes smooth and elastic.
Place the dough back into the bowl and lightly coat it with a little oil.
Step 3: Let the Dough Rest
Cover the bowl with a clean kitchen towel or plastic wrap.
Let the dough rest for at least 30 minutes. If you have more time, you can let it rest for up to an hour.
This resting period makes a big difference. It allows the gluten to relax, making the dough much easier to roll out. If your dough keeps shrinking while you roll it, give it another 10–15 minutes of resting time.
Step 4: Divide the Dough
After resting, divide the dough into approximately 12–16 equal pieces, depending on how large you want your flatbreads.
Roll each piece into a smooth ball. Keep the dough balls covered with a clean towel while you work so they don’t dry out.
Step 5: Roll the Flatbreads
Take one dough ball and flatten it slightly with your fingers.
Dust your work surface and rolling pin with a small amount of flour. Roll the dough into a thin, round circle.
Try to keep the thickness as even as possible. The thinner you roll the flatbread, the lighter and more flexible it will become.
Don’t worry if your circles aren’t perfectly round. Homemade flatbreads are supposed to have a rustic appearance!
Step 6: Cook the Flatbread
Heat a heavy skillet, cast-iron pan, or flat griddle over medium-high heat.
Once the pan is hot, place one rolled flatbread onto the dry skillet.
Cook for about 30–60 seconds, or until small bubbles begin to appear on the surface. Flip it and cook the other side.
You should see beautiful golden-brown spots developing on both sides.
For an especially soft and slightly puffed flatbread, gently press the edges and center with a clean spatula or cloth while cooking. Some flatbreads may puff up dramatically, while others may only develop small bubbles. Both are perfectly fine.
Avoid overcooking them. If you leave them on the pan too long, they can become dry and hard.
Step 7: Keep Them Soft
As each flatbread finishes cooking, place it inside a clean kitchen towel or covered container.
Stacking the hot flatbreads together allows steam to remain trapped between them, helping keep them soft and flexible.
If desired, brush each warm flatbread lightly with butter or ghee for extra flavor.
Tips for Perfect Homemade Flatbread
Use warm water: Warm water helps create a soft, workable dough.
Don’t make the dough too stiff: A very firm dough usually produces tougher flatbreads.
Let the dough rest: Don’t skip this step. Resting makes rolling much easier.
Preheat the pan: A properly heated skillet helps the flatbread cook quickly and develop those attractive golden spots.
Don’t overcook: Flatbreads only need a short time on each side.
Keep cooked flatbreads covered: Exposure to air can quickly dry them out.
Serving Ideas
These homemade flatbreads are incredibly versatile. Serve them warm with your favorite meals or use them as wraps.
They are delicious alongside:
- Chicken curry
- Beef or lamb stew
- Butter chicken
- Lentil soup
- Chickpea curry
- Grilled vegetables
- Kebabs
- Scrambled eggs
- Hummus
- Garlic butter
- Yogurt and fresh herbs
You can also use them as wraps. Fill a warm flatbread with grilled chicken, lettuce, tomatoes, cucumbers, onions, and your favorite sauce for a quick homemade lunch.
For breakfast, serve them with eggs, cheese, butter, or leftover vegetables.
How to Store Homemade Flatbread
Allow the cooked flatbreads to cool completely before storing them.
Place them in an airtight container or reusable food-storage bag. They can generally be kept at room temperature for a short period, but refrigerating them is better if you want to keep them longer.
To freeze them, place a sheet of parchment or wax paper between each flatbread and store the stack in a freezer-safe bag.
When ready to eat, reheat them in a hot skillet for a few seconds on each side. You can also warm them in the microwave under a slightly damp paper towel.
Final Thoughts
There is something special about a fresh stack of homemade flatbread. The soft texture, lightly toasted spots, and warm homemade flavor make these flatbreads much better than many packaged alternatives.
This recipe is simple enough for beginners but produces impressive results. Once you get comfortable with the dough, you can experiment with different flours, herbs, garlic, butter, or spices to create your own variations.
Make a large batch, keep them warm under a kitchen towel, and serve them with your favorite meals. Whether you’re using them to scoop up a flavorful curry or turning them into delicious wraps, these homemade flatbreads are sure to become a regular favorite in your kitchen.