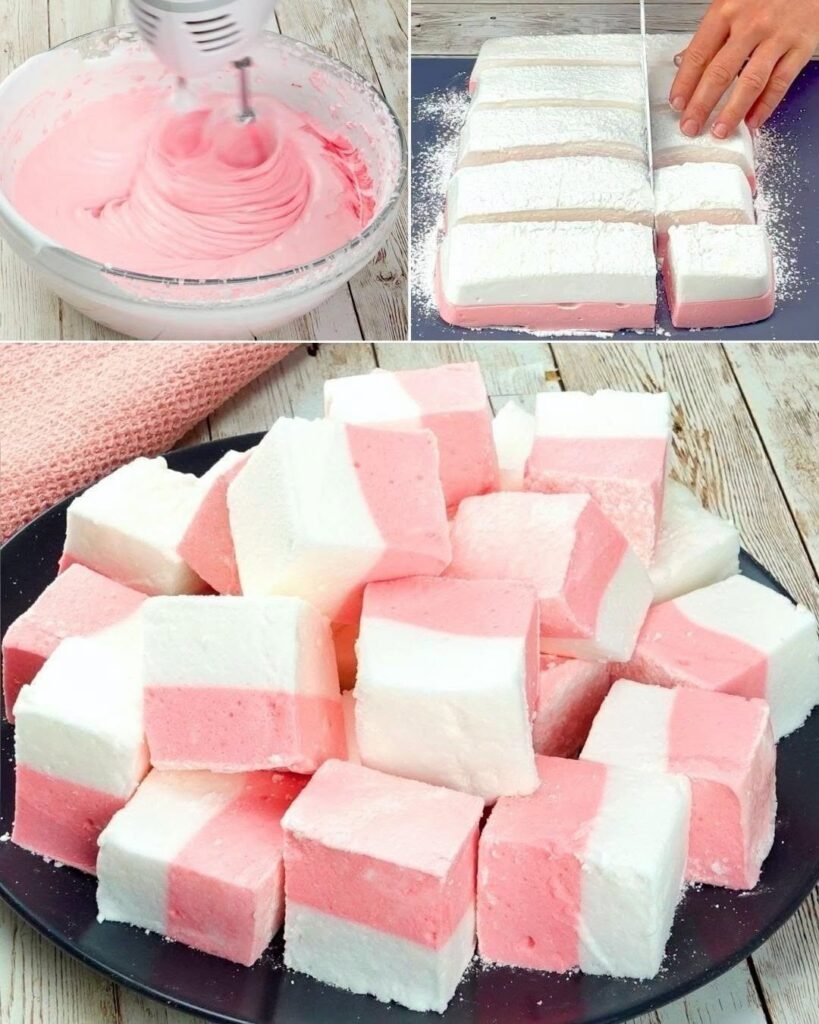

Soft, fluffy, and wonderfully sweet, these Strawberry Vanilla Marshmallows are a fun homemade treat that look just as beautiful as they taste. With their pretty pink-and-white layers, these marshmallows are perfect for parties, holidays, dessert tables, homemade gifts, or simply enjoying with a cup of hot chocolate.
Unlike store-bought marshmallows, homemade marshmallows have an incredibly light and airy texture. They practically melt in your mouth, and the combination of sweet vanilla and fruity strawberry makes them extra special.
The recipe may look fancy, but making marshmallows at home is surprisingly simple once you understand the process. The key is whipping the gelatin and hot sugar syrup until the mixture becomes thick, fluffy, and voluminous.
Why You’ll Love These Marshmallows
These homemade marshmallows are soft, pillowy, and full of flavor. The white vanilla layer is creamy and fragrant, while the pink strawberry layer adds a fruity twist and beautiful color.
They are also very customizable. You can make them completely pink, completely white, or create two-tone layers like the marshmallows shown in the photo.
Cut them into squares, hearts, stars, or other shapes depending on the occasion.
They are delicious eaten by themselves, but they are also wonderful in hot chocolate, s’mores, coffee drinks, or dessert recipes.
Ingredients
For approximately 24–30 marshmallows, depending on size, you will need:
For the Marshmallow Base
- 3 tablespoons unflavored powdered gelatin
- ½ cup cold water
- 1½ cups granulated sugar
- ½ cup light corn syrup
- ½ cup water
- ¼ teaspoon salt
- 2 teaspoons pure vanilla extract
For the Strawberry Layer
- 2–3 tablespoons strawberry gelatin powder or freeze-dried strawberry powder
- A few drops pink or red food coloring, optional
For Dusting
- ½ cup powdered sugar
- ½ cup cornstarch
You can also add a little extra freeze-dried strawberry powder to the dusting mixture for additional strawberry flavor.
Preparing the Pan
Start by preparing a 9 x 13-inch baking pan.
Lightly grease the pan with nonstick spray or a thin layer of neutral oil. Line it with parchment paper, leaving some paper hanging over the sides so the finished marshmallow can be lifted out easily.
Lightly grease the parchment paper as well.
In a small bowl, combine the powdered sugar and cornstarch.
Dust the bottom of the prepared pan generously with this mixture.
This coating prevents the marshmallow from sticking.
Step 1: Bloom the Gelatin
Pour ½ cup cold water into the bowl of a stand mixer.
Sprinkle the unflavored gelatin evenly over the water.
Let it sit for approximately 5–10 minutes.
This process is called blooming the gelatin. The gelatin absorbs the water and becomes soft, allowing it to dissolve properly when the hot syrup is added.
Do not skip this step because properly bloomed gelatin helps create the fluffy structure of the marshmallows.
Step 2: Prepare the Sugar Syrup
Place the granulated sugar, corn syrup, ½ cup water, and salt into a medium saucepan.
Heat the mixture over medium heat, stirring gently until the sugar dissolves.
Once the sugar has dissolved, stop stirring and allow the mixture to come to a boil.
Continue cooking until the syrup reaches approximately 240°F (116°C) on a candy thermometer.
This is known as the soft-ball stage and is important for achieving the correct marshmallow texture.
Use caution because the syrup becomes extremely hot.
Step 3: Combine the Syrup and Gelatin
With the mixer fitted with the whisk attachment, begin mixing the bloomed gelatin on low speed.
Slowly pour the hot sugar syrup into the bowl in a thin, steady stream.
Be careful not to splash the hot syrup.
Once all the syrup has been added, gradually increase the mixer speed.
Continue whipping for approximately 8–12 minutes.
The mixture should become thick, glossy, white, and dramatically increase in volume.
When you lift the whisk, the marshmallow mixture should fall back into the bowl in thick ribbons.
Add the vanilla extract during the final minute of mixing.
Creating the Two-Tone Effect
To create the beautiful pink-and-white layers shown in the photograph, divide the marshmallow mixture into two portions.
Leave one portion white and stir the strawberry powder or strawberry gelatin into the second portion.
Add a tiny amount of pink food coloring if you want a brighter pink shade.
Work quickly because marshmallow mixture begins to set as it cools.
Step 4: Make the Layers
Spread the white marshmallow mixture into the prepared pan.
Smooth the surface gently with a lightly greased spatula.
Next, carefully spread the strawberry marshmallow mixture over the white layer.
Try to spread it evenly without pressing too hard.
For a slightly swirled appearance, gently run a skewer or butter knife through the two layers.
If you prefer clearly defined layers like those pictured, simply smooth the strawberry layer directly over the white layer.
Dust the top generously with the powdered sugar and cornstarch mixture.
Step 5: Let the Marshmallows Set
Allow the marshmallows to sit at room temperature for at least 4–6 hours, or preferably overnight.
Do not cover them tightly while they are setting because excess moisture can make the surface sticky.
Once completely set, the marshmallow should feel firm and springy when gently pressed.
Step 6: Cut the Marshmallows
Generously dust a cutting board with the powdered sugar and cornstarch mixture.
Carefully lift the marshmallow slab from the pan using the parchment paper.
Place it on the prepared surface.
Dust a sharp knife with the coating mixture and cut the marshmallow into squares.
Wipe and dust the knife between cuts if it becomes sticky.
Immediately toss each marshmallow in the powdered sugar and cornstarch mixture so all sticky edges are covered.
Tips for Perfect Homemade Marshmallows
Use a candy thermometer: Accurate temperature is important when making the sugar syrup.
Bloom the gelatin properly: Give it enough time to absorb the cold water.
Whip thoroughly: The mixture needs plenty of air to become light and fluffy.
Work quickly: Once the marshmallow mixture is whipped, it begins setting relatively quickly.
Grease your tools: A lightly greased spatula and knife make the marshmallow much easier to handle.
Don’t skip the coating: Powdered sugar and cornstarch prevent the finished marshmallows from sticking together.
Let them set completely: Cutting them too early can result in messy edges and a softer texture.
How to Serve Strawberry Marshmallows
These marshmallows are delicious straight from the plate.
For a cozy treat, drop one into a mug of hot chocolate and watch it slowly melt into the drink.
They are also perfect for s’mores. Place one between graham crackers and chocolate for a fruity twist on the classic campfire dessert.
You can chop them into small pieces and use them as a topping for ice cream, brownies, cupcakes, or dessert boards.
For parties, arrange them on a platter with strawberries, chocolate-covered pretzels, cookies, and other sweet treats.
Storage
Store the finished marshmallows in an airtight container at room temperature.
Place parchment paper between layers if necessary to prevent sticking.
Keep them away from excessive heat and humidity because moisture can make homemade marshmallows sticky.
For the best texture, enjoy them within several days.
Flavor Variations
This recipe can easily be adapted into different flavors.
For raspberry marshmallows, replace the strawberry flavoring with freeze-dried raspberry powder.
For lemon marshmallows, add a little finely grated lemon zest and lemon flavoring.
For chocolate marshmallows, add cocoa powder or drizzle the finished marshmallows with melted chocolate.
You can also dip the bottoms of the finished marshmallows in melted chocolate and sprinkle them with crushed freeze-dried strawberries.
Final Thoughts
These Strawberry Vanilla Marshmallows are a beautiful homemade candy that combines a soft, fluffy texture with sweet vanilla and fruity strawberry flavor. The pink-and-white layers make them especially eye-catching, while their delicate texture makes them completely irresistible.
They are perfect for gifting, parties, holiday treats, hot chocolate, s’mores, or simply enjoying as a sweet snack.
Once you learn how easy homemade marshmallows can be, you can experiment with different colors, flavors, and shapes to create your own signature version. A batch of these pretty strawberry marshmallows is sure to bring a little extra sweetness to any occasion.